Thursday, September 30, 2010

New Opera 5.1.2 & 4.20 modded for Airtel

How to use OM 5.1.2 & 4.20 free :
First Create a New Connection
 Name :Opera (or) Anything
APN: airtelgprs.com
Proxy  Address : 94.246.126.253
Port: 80
Keep balance below 30 paisa.
now save the setting and use it.
It supports downloading.
Opera mini 4.20 is full screen for s60 5th (nokia 5233,5800)


AIRTEL FREE HELLOTUNE DHAMAKA!

Here is the Hello tune codes database [FIRST time on WWW] which have approximatelly all hello tunes upto 2007 ( not newer codes ) , So now on you can search any tune right from your own computer . You wont find this list anywhere :t

Code: [Select] [nofollow]
http://gstek.info/dwnlds/HT_DATABASE_www.gstek.info.zip

PASSWORD = gstek

Tuesday, September 21, 2010

How to download Videos From Facebook

How to download Videos From Facebook Facebook becomes no 1 social networking site now a days. As our last month article about how to convert youtube video to mp3 helped our many readers a lots from getting video converted from you tube to mp3 ,I received many comments from our readers demanding tricks on How to download Videos from   Facebook [...]

Wednesday, September 15, 2010

How to access the sharing data offline


Access the shared data offline allows you to keep using your shared files, folders and software programs when disconnected from the data server. When you reconnect to your data server, all files will be synchronized to the files on the network.  
There are two types of configurations required to set the access shared folders offline available, one for data server and other for client computer. 
Configuration on Data Server.

First locate the folders that you would like to share or make new folders then share these folders so they can be accessible to any one on the network.
Now right click on that folder and click on the option "Sharing and security".

A small dialog box will appear with the title "data properties". Under the "Sharing" tab, select the check box "Share this folder on the network" under the "Network sharing and security".

Now set the share level permissions that you want to give the users on every folder. Enable cache of share folders by click on cache button (by default it will be enabled).

Configuration on Client Computer 
On the client computer, first open My Computer then click on Tools.
In Tools menu bar, click on Folder Options, a window will appear with the title Folder Options.
Under the Offline File tab, check the option Enable Offline File. Here you can choose the synchronization process "Synchronize all offline files when logging on", "Synchronize all offline files before logging off" and others.

Click on Apply button to save the settings and then Ok button to close this window.
Now sitting on the client computer, try to access the shared folder from the data server.
First Right click on the shared folder and Click on Make available offline.
To synchronizing the offline work from client computer to data server, again open My Computer then click on Tools. Click on Synchronize then click on synchronizing button.
 

After that down to data server and then try to access share folders by give the UNC (Universal Naming Convention) path of data server. But it will be accessible weather the server is down or up.

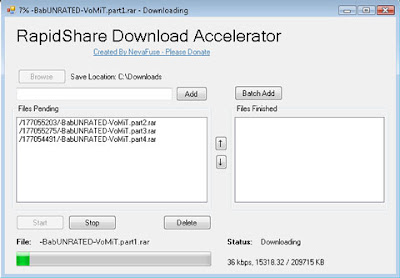
Download Multiple Free Files From Rapidshare


Rapidshare allows to download only a single file at a time with free account. If you want to download multiple files at the same time, you need to buy a premium account but now you can download multiple files from Rapidshare free account without paying anything with RapidShare Download Accelerator.


With RapidShare Download Accelerator, you can add all the files you'd like to download, and it will do all the annoying work for you. Now you can just sit back and watch your files download without paying a dime.

Links : Download Rapidshare Download Accelerator

Friday, September 10, 2010

Hidden drives

Want to hide drives with sensitive material on them from prying eyes? You can prevent any or all disk drives from being displayed in My Computer and Explorer.
It takes some Registry tweaks, which can be tricky. Check instructions at www.WE-Compute.com/registry.html if you are new to Registry editing.
In the Registry navigate to HKEY__USER\Software\Microsoft\Windows\CurrentVersion\Policies\Explorer. Right-click on Explorer and choose New and DWORD value. In the pane on the right, rename the new value NoDrives and double-click on it to open the Edit DWORD Value box. Click the Decimal option to select it, instead of the Hexidecimal option.
Now for the complicated part. To hide a drive or drives, a number that corresponds to the drive(s) must be entered. Enter the value listed below for the drive. If multiple drives are to be hidden, add the numbers for those drives together. For example, hiding drives D and E requires a value of 24, because you are adding the value for D (8) to the value for E (16), which equals 24.

How to Use Windows 7 Without Activation

Most of you might be aware of the fact that it is possible to use Windows 7 and Vista for 120 days without activation. This is actually possible using the slmgr -rearm command which will extend the grace period from 30 days to 120 days. However in this post I will show you a small trick using which it is possible to use Windows 7 without activation for approximately an year! Here is a way to do that.
1. Goto “Start Menu -> All Programs -> Accessories” . Right click on “Command Prompt” and select “Run as Administrator“. If you are not the administrator then you are prompted to enter the password, or else you can proceed to step-2.
2. Now type the following command and hit enter
slmgr -rearm
3. You will be prompted to restart the computer. Once restarted the trial period will be once again reset to 30 days. You can use the above command for up to 3 times by which you can extend the trial period to 120 days without activation.
4. Now comes the actual trick by which you can extend the trial period for another 240 days. Open Registry Editor (type regedit in “Run” and hit Enter) and navigate to the following location

HKEY_LOCAL_MACHINE\SOFTWARE\Microsoft\Windows NT\CurrentVersion\SoftwareProtectionPlatform

5. In right-side pane, change value of SkipRearm to 1. 6. Now you will be able to use the slmgr -rearm command for another 8 times so that you can skip activation process for another 240 days. So you will get 120 + 240 = 360 days of free Windows 7 usage.
120 days using “slmgr -rearm” command before registry edit +                                                                                                                                                                
240 days using “slmgr -rearm” command after registry edit
 =      360 Days

Convert Any Document or Web Page to PDF

Convert Any Document or Web Page to PDF

Somebody just told you that you need to have Adobe Acrobat (Writer) to create a PDF file? Guess what, you can get away from that pricey piece of software if you just need to convert some documents to pdf, without a need of fancy editing the pdf document.
Here's how. Thanks to the BullZip, who provides a Free Pdf printer. With this free tool, you can simply "print out" your document or webpage to a pdf file, just about the same way as you print it out to a printer.

You can visit BullZip.com for more information about the software.
Here the direct link to BullZip downloads page: Downloads
  1. To get started, first follow the link above and download Free Pdf Printer from BullZip, then install it to your computer.
  2. Once you're done, you might need to close the program (or the web browser) which you're currently viewing the document. This helps refreshing the list of available printers on your computer.
  3. Once you get back to the document you want to convert, perform the same steps are you print out the document, i.e. File > Print ...
  4. When you see the Print window pop-up, select "Bullzip PDF Printer" under "Printers", then click "OK".
  5. BullZip PDF Printer will then start to analyze your document and display a new pop-up window, where you can direct it to the location you want to save the pdf file.
  6. Follow the pop-up windows and.. hola! The PDF document is created!